AI Chat
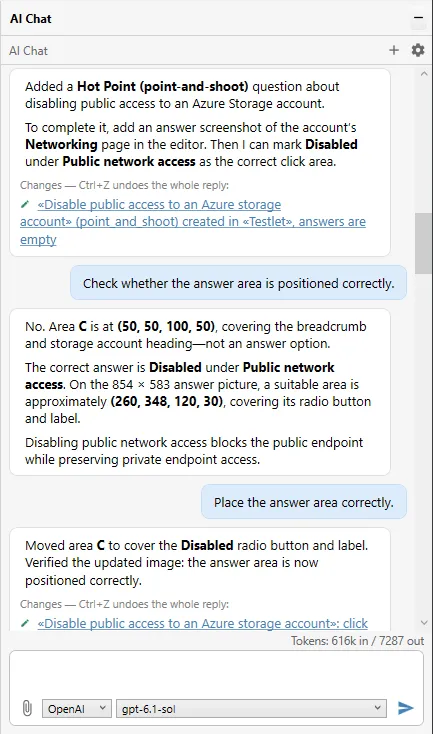
The AI chat is an artificial intelligence assistant that sees the open test and can edit it. You can write to it in plain language.
What it can do:
- check the correct answer and the explanation;
- fix typos in the question and the answer options;
- write or improve the explanation (Explanation);
- assign sections and difficulty levels;
- transfer questions from PDF, Word, RTF, text or a screenshot into the test;
- answer questions about the test: how many questions are in a section, which ones lack explanations, and so on.
To open and close the chat: Document → AI Chat, the toolbar button or Ctrl+Alt+I. The chat opens on the right side of the window.
Setup
On first use, the chat offers to connect an AI service: the Set up AI provider button. Later, you can open the settings with the gear button (AI chat settings).
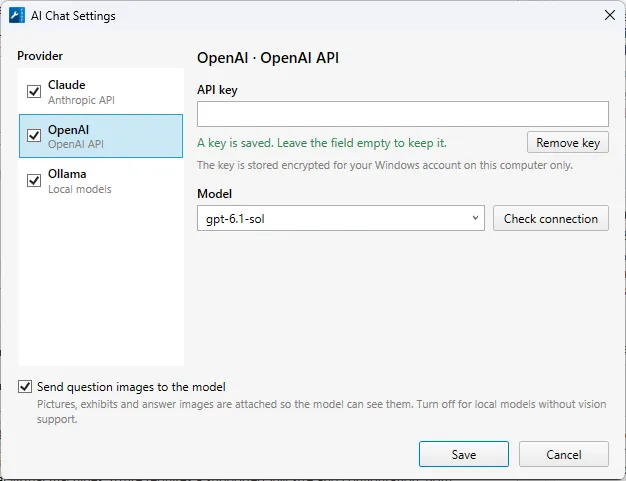
Three providers are available:
| Provider | What you need | Notes |
|---|---|---|
| Claude (Anthropic API) | An Anthropic API key | The test content is sent to Anthropic |
| OpenAI (OpenAI API) | An OpenAI API key | The test content is sent to OpenAI |
| Ollama (local models) | Ollama installed and a model downloaded | Runs on your computer; the test is not sent anywhere. The model must support tool calling (for example, qwen3, llama3.1, mistral-nemo) |
Setup steps:
- Choose a provider in the list.
- Enter the API key (for Ollama — the server address, Ollama server address).
- Click Check connection. On success, "Connected" and the number of available models are shown.
- Choose a model in the Model list.
- Click Save.
Additional options:
- Send question images to the model — send images from questions, answers and exhibits so the model can "see" them. Turn it off for local models that do not support images.
- Show in the chat — show the provider in the chat's selection list.
- Remove key — delete the saved key.
The key is stored encrypted on this computer only and only for your Windows account. If a key is already saved, you can leave the field empty.
Using the chat
- Select the question (or question set, exam) you want to ask about in the tree.
- Type your request in the field at the bottom and press
Enter. For a new line, pressShift+Enter. - While the assistant is working, you can see what it is doing: "Thinking…", "Working with the document: …". The Stop button interrupts the reply.
Example requests:
- "Check the correct answer of this question"
- "Fix typos in this question and its answers"
- "Write an explanation for every question in this set that doesn't have one"
- "Set the difficulty for all questions in the exam"
- "Transfer the questions from the attached file into Question Set 1"
The first time you use a cloud provider, the application warns you that the test content (questions, answers, explanations) will be sent to that service.
If the assistant is about to perform an action that requires confirmation, the Allow and Cancel buttons appear.
Undoing changes
After the assistant replies, a list of changes (Changes) appears below the reply. All changes made by one reply are undone with a single Ctrl+Z.
Choosing a model
At the bottom, next to the attach button, there are two lists: the provider and the model. You can change them at any time — the conversation continues with the new model.
New conversation
The "+" button (New chat) in the chat header starts the conversation over. The conversation also starts over when you open another file, and it is not kept after the application is closed.
Attaching files
The paperclip button attaches files to a message. You can also drag files into the chat or paste a screenshot with Ctrl+V.
Supported: PDF, Word (.docx), RTF, text files (.txt, .md, .csv, .json, .xml, .html) and images (.png, .jpg, .gif, .bmp).
Limitations:
- old Word files (
.doc) are not supported — save them as.docxor PDF; - text cannot be extracted from a scanned PDF — attach screenshots of its pages instead;
- only text is taken from PDF and Word; their images are not transferred into the test;
- there are limits on the file size and on the number of files per message.
Limitations
- The assistant adds questions only to existing question sets and testlets. Before transferring a large file, create the question sets you need.
- The assistant performs a limited number of actions per reply. On large files, the transfer may stop halfway — type "continue".
- AI can make mistakes. Check its changes, especially the correct answers.